From: dreamtube7 This is a simple straight forward example of how to build a flash website perfect for people who are just starting out with flash.
From: dreamtube7 This is a simple straight forward example of how to build a flash website perfect for people who are just starting out with flash.
From: tutvid
This is a response for the Flash Gallery tutorial showing how to create prev and next buttons for the gallery.
Very Simple tutorial
Visit http://www.omgpcgames.com/Forums for any questions you may have to ask me. Do not PM me on Youtube, register an account, and post in the 'Photoshop / Media Work' Forum.PLEASE VOTE FIVE, IF YOU LIKED IT.I'm looking for more ideas for tutorials.. Please leave recommendations in the comments!--This tutorial quickly goes over onion skinning, layers, embedded animations, motion tweens and finally shape tweens.This isn't an in depth tutorial, but hopefully it might make things a bit easier for you.I apologise if it seems rushed. It was 1:00 AM, and I was in a rush to finish up.


Here are three methods that will allow you to make black and white photo with different styles.

Here is the easiest method and fastest.
Your photo now in black and white.
Many of you will be disappointed with the black and white obtained, I advise you therefore to use the other two techniques.
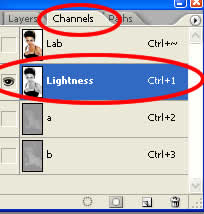
Another method also fairly simple and gives you a more accurate adjustment.

Here in mode Lab we have three layers but they are different, the first L which is a component of luminance, a component which is the range of colors ranging from red to green and b component which is the gamut from yellow to blue.

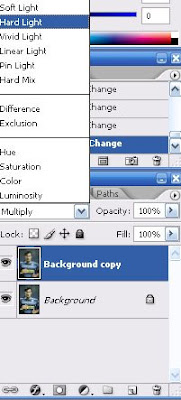
This is certainly one of the methods which will give you the best results and it remains quite simple.
 , and click on "Channel mixer."
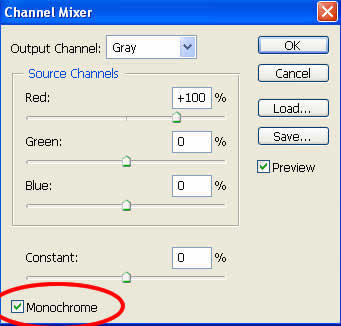

Tip: If you want a Black and White rather classic, the total percentage of layers must be equal to 100%. (eg R: 40% G: 20% B: 40%).
However, you can not respect this rule if you are looking for special treatment.

Here's another way to make a 3D text with photoshop, this method is simple and yet it can have different results by changing a few things in its execution.
STEP 1:
I create a new document, 500*500 pxl, By using File-->> New (Ctrl+N).
STEP 2:
I place my text at the centre of my image (I chose a color black), By using Horizontal Type tool (T).  STEP 3:
I rasterize the layer of my text and I called it text1 by using Layer-->> Rasterize-->> Type.
STEP 4:
then I change with the prospect, By using Edit-->> Transform-->> Perspective. STEP 5:
I use filter-->> Stylize-->> Emboss with the following adjustments:Angle: 110, Height: 6, Amount: 105. 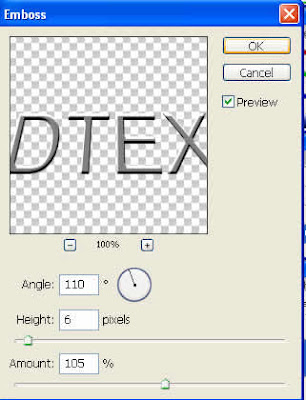 STEP 6:
I will now create my volume, for that I select my text1 layer, and then I take the tool Move (v) and I press alt while pressing the top arrow (about 26 times). STEP 7:
I merges all my by selecting all my layers thin use Layer-->> Mearge layers (Ctrl+E).
Step 8:
Add a drop shadow: distance 50 and size 50. By using Layer-->> Layer style-->> Drop shadow.
 See the final work below:
From: tutvid In this video we will start with a blank flash document and build using flash drawing tools and lots of actionscript a simple functioning calculator which performs Addition, Subtraction, Multiplication, and Division. Have fun with this one and learn lots of Actionscript 3.0!
From: tutvid We will make a nice little photo gallery in Flash in the following tutorial. All you need are a few images and a few thumbnails for them, the rest is just follow along and it works with any images!
<a href="http://tutfree.blogspot.com/2008/01/create-photo-gallery-and-thumbnails.html"> <object width="425" height="355"> <param name="movie" value="http://www.youtube.com/v/cylX1lThTN0&hl=en"> </param> <param name="wmode" value="transparent"> </param> <embed src="http://www.youtube.com/v/cylX1lThTN0&hl=en" type="application/x-shockwave-flash" wmode="transparent" width="425" height="355"></embed> </object> <br /> Flash Tutorial :::: Create a Photo Gallery and Thumbnails!</a>
From: tutvid : Welcome to this video tutorial! In the following video we will learn how to load text from a text file sitting on a web server and display it in flash using dynamic text and actionscript. We will also learn how to load jpg,gif,png, and swf files using actionscript. All of the files loaded into our flash movie will be loaded from an external web server! Actionscript 2.0 is the actionscript version used in this video. Please enjoy responsibly and check out the site http://www.tutvid.com
From: tutvid : Make this simple preloader(loading bar) or take it to the next level with the later part of the tutorial. Hope you enjoy!
From: tutvid : In this tutorial we will strat from scratch and build a navigation bar and then convert one of the buttons to a drop down button. We will also learn how to link the buttons within the drop down to sites and pages out on the web! Put this tutorial in your site "copy & past the code" <a href="http://tutfree.blogspot.com/2008/01/flash-tutorial-create-drop-down-menu.html"> <object width="425" height="355"> <param name="movie" value="http://www.youtube.com/v/VHVYWcNitq4&hl=en"> </param> <param name="wmode" value="transparent"> </param> <embed src="http://www.youtube.com/v/VHVYWcNitq4&hl=en" type="application/x-shockwave-flash" wmode="transparent" width="425" height="355"></embed> </object> <br /> Flash Tutorial Create a Drop down menu +link it to websites! </a>
From: tutvid : -----We will start with nothing more than a blank Flash document and 10 100px X 100px thumbnails and from that little bit we will construct this sweet scrolling thumbnail bar. This thumbnail bar will move in different directions depending on where the users mouse is. It will also stop when the user rolls onto a certain part of it and each thumbnail will light up as the user rollover each individual thumbnail! Lots to learn! Have fun with this one! Put this tutorial in your site "copy & past the code" <a href="http://tutfree.blogspot.com/2008/01/adobe-flash-tutorial-scrolling.html"> <object width="425" height="355"> <param name="movie" value="http://www.youtube.com/v/2TrIQqu2MkU&hl=en"> </param> <param name="wmode" value="transparent"> </param> <embed src="http://www.youtube.com/v/2TrIQqu2MkU&hl=en" type="application/x-shockwave-flash" wmode="transparent" width="425" height="355"></embed> </object> <br /> Adobe Flash Tutorial! Scrolling Thumbnails w/ Mouse Control!(Video)</a>
Hear are a one flash tutorial in to part. note: this flash tutorial not made by this site owner. hear is the first half: From: xefpatterson ----The first half of a flash tutorial I made for beginners. (its in 2 parts because the quality would have been bad)In the video I forget to say that F7 creates a new blank frame.Hope it helps all those who were asking how I made my animations.And yeah, the program is Macro media Flash Mx 6(sorry for the disturbing noises I had a cold) From: xefpatterson The second half.
Sites for flash tutorial some of my favorites sites w3schools Flash Tutorial Tutorials - ActionScript.org Flash, Flex and ActionScript tutorialized flashperfection flashkit entheosweb echoecho baycongroup Adobe - Flash Developer Center adobe

